Point 2 Point MK2 – Layout Divider
Equidistant Layout with Centre Finder


In Stock
$34.95


Bigger Stonger and More Accurate.
The NEW Point 2 Point™ Mk2 takes the hassle out of marking out jobs that need equal spacings, ideal for those of us whose eye instantly settles on an out of place screw head. The Point 2 Point™ saves a good deal of discomfort and time spent with a calculator, tape measure and note pad. Finding the perfect sequence and spacings for a row of coat hooks, screws, nails, dowels, or shirt buttons is as easy as an equally divided piece of cake.
Simply lock the unit tight to transfer your measurement, ideal over long distances for a series of marking points e.g. banister rails. Finding centre is quick and simple, the Point 2 Point is fast and more accurate than ever. Its a real time saver!
1. Equal Spacing Layout
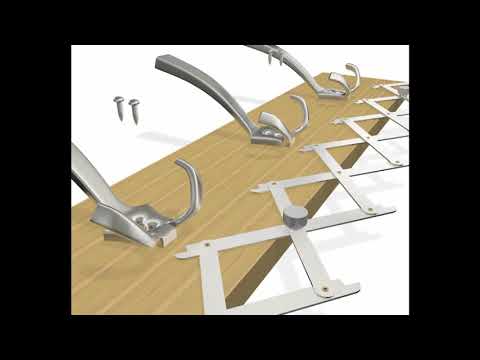
Any finished job that leaves an exposed run of screw heads, nails, or even coat hooks can be a hassle to space equally. If you don’t take the time to space them accurately, the only thing you’ll notice is the screw head that’s out of sync. The P2P Mk2 works out the correct number and position of a run of fixings, quickly and accurately. The 7 integral uprights built onto the Point 2 Point™ mechanism expand equally to give 7 accurate marking points. If it’s worth doing it’s worth doing properly.
2. Center Point Finder
Where’s the middle? How many times do you just want to find the center of a board. The central upright of the new Point 2 Point™ mk2 instantly centers itself on boards upto 2.1/2 ft in width.
3. Layout Transfers
The key to successfully edge jointing panels with dowels or flat dowels (biscuits) is a consistently repeatable dowel position. Set the Point to Point™ mechanism upto 5’’ between points and lock-in the precise setting. Then the layout markings can be transferred from board to board as many times as is required.
4. Calculating the maximum number of subdivisions
Minimizing wastage on a solid wood project can save a considerable amount of money. That starts with maximizing the size and number of components that can be extracted from each board at the start of a project. Using the Point 2 Point™ gives an excellent visual guide when marking out prior to rough sawing.
NEW – Mechanism design
In order to improve the performance of the new Point 2 Point™, it’s now manufactured using higher tolerances – reducing play and increasing overall accuracy.
NEW – Increased extension range
The new Point 2 Point™ Mk2 boasts a new maximum extension of 2 1/2’. A full 25% more than its predecessor.
NEW – More Robust Uprights and Cross Members
The components that make up the new mk2 mechanism are fully 50% thicker than the original. Making it considerably more robust and hard wearing.
NEW – Larger Pinch Bolts
Rather than having to tighten 4 x pinch bolts to lock in a setting on the original Mk1, the Mk2 has just 2 x Pinch bolts. They’re much larger, more ergonomic and quicker to use.
NEW – Nylon Bushes
The original pivot points on the Mk1 were bushless (metal on metal). The Mk2 assembly has 0.5mm nylon bushes fitted to 19 pivot points, making the scissor action smoother and improving accuracy at the same time.
NEW – More accurate
The Point 2 Point™ Mk2 is genuinely an entirely new product. It’s new form has in part been shaped by suggestions, ideas and feedback from end users around the world; so thank you very much.
Marking out equal spacings for a row of fixings. Screws, nails, dowels, pins etc
The traditional way to plot the positions of a row of fixings – would be to measure the length of the run and divide by the number of points plus one. Then divide the extra one point by two and that gives your starting and finishing points. Then taking the division total on the calculator, measure out each of the remaining points. Alternatively extend a Point 2 Point™ Mk2 fully and bring the mechanism down to the required size. Lock the setting in place with the Point 2 Point’s™ pinch bolts and you’re ready to start marking out.
Biscuiting jointing (flat doweling) a carcase
Flat doweling is a relatively modern method of jointing a carcase. It’s quick, efficient and strong. The process is a simple one – mark out the position of the flat dowels -machine the flat dowel semi circular grooves into the top/bottom and sides of the carcase. Dry assemble the carcase to ensure that all the grooved recesses line up with each other. Apply glue to the grooves – insert the flat dowels and clamp the carcase up. The Point 2 Point™ comes in handy when working on how many flat dowels to use. It gives an instant visual guide to help decide the number and spacings per run. Having decided pinch up the mechanism up, holding the space setting in place. That setting can then be transferred to all the components needing to be marked out.
Subdividing rough sawn timbers
Making bespoke furniture from solid wood can be an expensive commitment. However savings can be made (and disasters avoided) by ensuring that best use of the boards are made. Efficient marking out prior to rough sawing is where the Point 2 Point™ helps get the maximum number of components from the minimum number of boards. Especially when dealing with a tapering waney edged board. Use the center finder (middle upright) to plot a central line dividing the board and work the layout from the center outward from that point. This will allow the largest number of the longest pieces to be cut from the central area of the board.
Portion control in the kitchen – dividing up cakes evenly
We sold the very first Point 2 Point™ over 13 years ago strangely not to a woodworker but to a chef who saw an immediate application in the kitchen – subdividing baked goods and cakes. This meant avoiding the annoying and costly end of the cake that was either too large to be a single slice but not large enough to be 2 slices. Always getting the last slice was described as.. “really satisfying… and pure profit… out of thin air!”
Positioning a row of buttons on a shirt
Now the Point 2 Point™ had broken out of the woodworking shop there was no stopping it. End users were finding all sorts of different uses for it. They’re being bought as a “crafters must have” and 1000’s of Point 2 Point’s™ have already found their way into sewing boxes across the country. From instantly indicating positions for buttons on a blouse to evenly dividing curtain material into pleats.
For Right and Left handed users
Always have the “Upright cut out” facing the pencil holding hand, if they do not, rotate the Point 2 Point™ 180 deg.
For consistent results always expand the mechanism close to its maximum width before closing the mechanism down to the setting you require.
Due to the slight but necessary play within the mechanism the Point 2 Point is not suitable for marking out small high tolerance joints such as dovetails and finger joints.
When possible use the Point 2 Point on a flat surface.
Always ensure both Pinch bolts are loose before expanding the mechanism.
1x Universal Instruction Manual
1x Point 2 Pont mk2
1x Set of locking bars


